Hurl Rigs

Hurl Rigs

A friend of mine, NYC based cinematographer Jon Miller, attended the ICG party at Sundance this year and was kind enough to bring back some images and info. Most of note, Shane Hurlbut, ASC was there showing some of his HDSLR solutions and sharing information with colleagues. I hope Mr. Hurlbut doesn't mind if I relay some of it here. If not, I'll be happy to remove this post immediately.

Here's the Hurl Hardware:

Funky Blue Handles, Z-Finder, Baseplate with 15mm Rods, Remote Focus

hurl4.jpg
hurl1.jpg

Custom Machined Aluminum Cage that looks you can mount just about anything to.

hurl2.jpg

Cage with Handheld Rig, On-board Monitor, FIZ, and V-Mount Battery in the back

hurl3.jpg

Other Hurl advice and tricks:

Use Twixtor for 30p to 24p conversions. I haven't tried this but I've heard from several users this is an excellent, though time intensive solution.  

Use Cineform Neoscene to open up the Canon codec and turn it into a quality video file. There's some very interesting information about this posted here on the Cineform Insider blog.

Another trick he uses to emulate the quality of a film stock is to shoot some 35mm film of an evenly lit gray card that fills the frame. This picks up the grain characteristics and the gray is easily removed in After Effects. This is then composited on the SLR footage which helps to take the curse off the digital. This is actually a fairly old trick and I remember doing this in college though I shot 16 against a white wall and it didn't work nearly as well. The things we do for that film look! I wonder if once digital has really nailed it if people won't suddenly be nostalgic for that crappy old video look.. Makes you wonder. 

In the spirit of sharing information I think this is really fantastic stuff. Mr. Hurlbut seems like a very generous guy and has already contributed a lot to the HDSLR filmmaking community. Looking forward to seeing more of his solutions and inventions. 

UPDATE:

Stuart Allman of Illuma Blog sent me this great post that has more information on the rigs and Shane Hurlbut's advice on using them. Thanks Stuart! 

Great Lens Adapter Solution

Great Lens Adapter Solution

I recently shot a project with this package and I really enjoyed working with it.

IMG_0539.JPG
IMG_0553.JPG
IMG_0536.JPG

This is a Sony EX3 and a P+S Technik Pro35 joined together with the Fujinon B4 Adapter. The camera package was rented from my friends at Tamberelli Digital in Manhattan and the support and service they provided was top notch. The lens in the pic is one of the new Zeiss Compact Primes - extremely sharp and well matched lenses but the wildly varying maximum apertures could be a potential problem - 18mm T3.6, 25mm T2.9, 35mm T 2.1, 50mm T1.5, 85mm T1.5. For this project, luckily it wasn't such an issue. This version of the Pro35 is made for 2/3" cameras that have a B4 mount so you need the Fujinon to adapt it to the EX3's Mini Bayonet. There is a new EX3 Version of the Pro35 available that works with a relay lens to optimally get the front lens' entire field of view onto the 1/2" chipset. That product wasn't available at the time so after some testing, I found this to be a fantastic solution. Because the Pro35 is made to project the front lens' image onto the larger 2/3" chip, there is a crop factor when used with the EX3. By my calculations, I thought it would be about x2.9 but the B4 adapter pushes the image plane farther away from the sensor, thus making it smaller, thus reducing the crop factor. I basically doubled the focal length of the primes and knocked a little off, finding that to be pretty accurate.

Using the very handy pCam software, here's what a 25mm at 5' would look like with the Pro 35 on a 2/3" camera:

IMG_0533.PNG

And this is approximately what the same 25mm looked like on the 1/2" EX3 with the Fujinon B4 adapter. As you can see, there is a crop but it's not too bad.

IMG_0532.PNG

My biggest issue with Lens Adapters is that they're so long and cumbersome and without a lot of additional hardware workarounds, they leave the camera very front heavy and unwieldy.

Maybe this is an extreme example, but who would want to operate something like this? Is there a camera in there somewhere?

hoopty.jpg

Even this was not without it's headaches. Remember this guy? Good old MovieTube.. I don't miss you. I'm sure someone will be offended that I don't like the MovieTube so I'll go ahead and apologize in advance... It was a technological stepping stone. A really awkward, unwieldy, heavy, cumbersome stepping stone.

Movietube-ST-big.gif

There's also focus issues with lens adapters as you have 3 potential places for de-focus: the front lens, the back focus on the adapter, and the stock lens. When you're running and gunning, this can really slow things down. If I can have it my way, I'm going to burden my brain with as few hardware related thoughts as possible so I can focus on making effective creative decisions. I think Lens Adapters are a great solution but can also  be a lot of headaches (and back aches!). Because the Pro35 bypasses the stocks lens and has such precise controls, I found it to be a lot more comfortable to operate and with less things to worry my brain about. With the Zacuto plate, shoulder pad, and handles, the rig effortlessly went from studio mode to handheld as fast as we could get it off the sticks. That was awesome. Definitely the biggest issue with this setup is the crop factor. Without a real relay lens, your 18mm is more like a 35 or a 40. That's wide but not really wide enough in a tight space or if you have to get exceedingly close to your subject. Because the Pro35 pops off as if it were just another B4 lens, going back to the stock lens was as fast and painless as a lens change. Obviously the colorimetry between the two is quite different so my workaround was to paint a scene file to match the EX3 lens as closely to the Zeiss on the Pro35 as I could. When you're super wide, you aren't really taking advantage of the depth of field characteristics anyways so I found that by matching a color chart on the stock lens to the lens adapter and taking out some detail, the match was actually quite close and changing between the two was fast a normal lens change.

Given that with a lens adapter you're usually trying to create as much depth of field as possible, maybe this rig's telephoto effect is actually an advantage? For this project it was a great solution and got me images that made me and the client very happy. Will definitely be using this package again.

HDSLR Solution

HDSLR Solution

I really want the next version of the 5D Mark II but I don't think I can afford to wait for it. This Canon 7D is just awesome. I played around with one at HD Expo and it definitely planted its little seed of desire in me. I'm most likely going to have to buy something camera-wise this year so what's it going to be? An EX1 definitely fits the mold for most of the work I do but this setup may just work:

Canon 7D Body $1699 @ Amazon

That's just the body. Would need a few cards, extra batts, case, etc. but those are relatively inexpensive. Also, Canon has a battery extender/hand grip for this camera that I'm going to guess will be a necessity for use in an actual production environment. Not sure the price on that.

Canon Zoom Wide Angle-Telephoto EF 24-70mm f/2.8L USM Autofocus Lens $1379 @ B&H

This wide angle lens will magically transform into a 38.4-112 on your 7D. A good range but really not quite wide enough. I would probably pick up the 17-40 as well which is another $1549 at our good friends, B&H.

and the most expensive item ;) but without it, I can't imagine the back, shoulder, and neck pain.

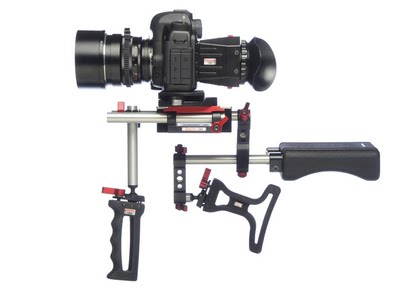
Zacuto DSLR Marksman $2216

I don't know anything about these Zacuto SLR Rigs but this one looks like it would actually be pretty comfortable to operate. Their plate and rod system for lens adapters is the sh** so I imagine this guy gets the job done.

TOTAL BASE COST: $5294

Not comparing the DoF to a naked EX1 here but this 7D setup is still cheaper than a new camera alone which is $6099. For a real basis of DoF comparison, to go the lens adapter route you could effectively triple that. So we'll say about $20,000 for an EX-1, Letus Ultimate, Zacuto setup, and a handful of used primes (not a fancy ZF set).

So in my crude and hurried assessment, both camera packages do the same thing: create beautiful filmic images with all that sexy depth of field. Both solutions are far from perfect. Each has its own unique set of advantages and disadvantages but comparing 5,200 to 20,000 is one point that can't be argued.