NAB 2012 - Round Up

NAB 2012 - Round Up

I suspected that this year's show wouldn't be as overloaded with new product as last year because most of the major players have already rolled out the flagships that will carry them for the next few years. I found this to be somewhat the case but not entirely as there were definitely a handful of "show stoppers" on display. The emphasis this year seemed to be much less on new, groundbreaking wares and more "this is what we're working with now, and here's how we can do it better." 

While NAB is in many ways a portal of things to come, this year there were far fewer 3D announcements and a lot more emphasis on 4K which is evident in the current market as well. 3D has struggled to gain much, if any, traction outside of theatrical content and the resolution war is heating up now that all the major manufacturers are, or will be (IBC is next), intro-ing cameras offering greater than HD resolution. This is interesting because it's really not much different than the megapixel war with consumer digital cameras. Resolution while incredibly important is still relative to optics, image processing, presentation, and many other factors. Bigger isn't necessarily better though it's obviously a huge marketing opportunity for these vendors.

Maybe my interests have shifted somewhat as my market, broadcast bound projects, has decidedly settled on the Alexa for now. Because of this my energies are very tied up with solutions for that platform. That said, I didn't spend 3 days at the show exclusively checking out new cameras and hardware but spent much of that time researching workflow and archival solutions and demoing tons of new options for creating on-set deliverables, a topic I've covered at length on this site.

What was really excellent though wasn't all the new gack but the opportunity to meet in person so many people I've been in correspondence with. That's what's great about NAB - getting all these professionals from various facets of the industry together in the same location and the exchange of ideas and information that results. it's inspiring and I left Vegas feeling optimistic about the business and where it's going. 

Quick note, what I had on hand to shoot stills with this year was the trusty Leica M9 w/ Summilux-M 35mm Lens. My favorite camera in the world but defintiely not the best choice for shooting product closeups so I'll apologize for the the uninspired photographic component of this post. 

leicagram.jpeg

ALEXA. I was pleased to see Arri announce some very nice new features. Nothing earth shattering, but quietly useful. 

b_alexa_plus_5.jpeg

4:3 Sensor no longer exclusive to Alexa Studio:

You can now purchase an Alexa Plus with a 4:3 sensor in it. You cannot upgrade your existing camera to the new sensor which is certain to sour a few owners. However, this is nice because the Alexa Studio is a hefty rental and as neat as it is, I'm not entirely sold on the optical viewfinder. I'm not a camera operator though and a handful of my colleagues are really into it. I can definitely see the appeal. It will be great to have a more cost effective rental option for anamorphic capture or simply recording a big old square raster with spherical lenses for VFX work. The flexibility of the Alexa system continues to evolve along with the market. Ryan Koo wrote a good article on the topic >>>

2K ProRes Recording:

L1001486.jpg

Existing 16:9 Alexa sensors will soon be able to record to SxS cards in ProRes 4444 or DNx RGB at 2K resolution, 2048x1152. The new 4:3 sensor will be 2048x1536. Not a ton of extra resolution but appealing nonetheless. Also on the horizon - new debayer algorithm for improved sharpness and real time ArriRaw playback out of ArriRaw Converter.

newrasters.gif

Also at Arri's booth, Pomfort was there demoing their solution for Alexa color management, LiveGrade.

Pomfort's Patrick Renner

L1001482.jpg

I've written about this software at length and have been a beta user since day one. It's really come a long way and now that CDL and Pre or Post Linearization Color Correction has been implemented, LiveGrade is a legit on-set color management solution for any number of cameras. 

I think there is such a plethora of great NAB coverage I'm not going to spend the time creating a massive post covering all the big beats like I did last year. Here's a few things that stuck with me though - 

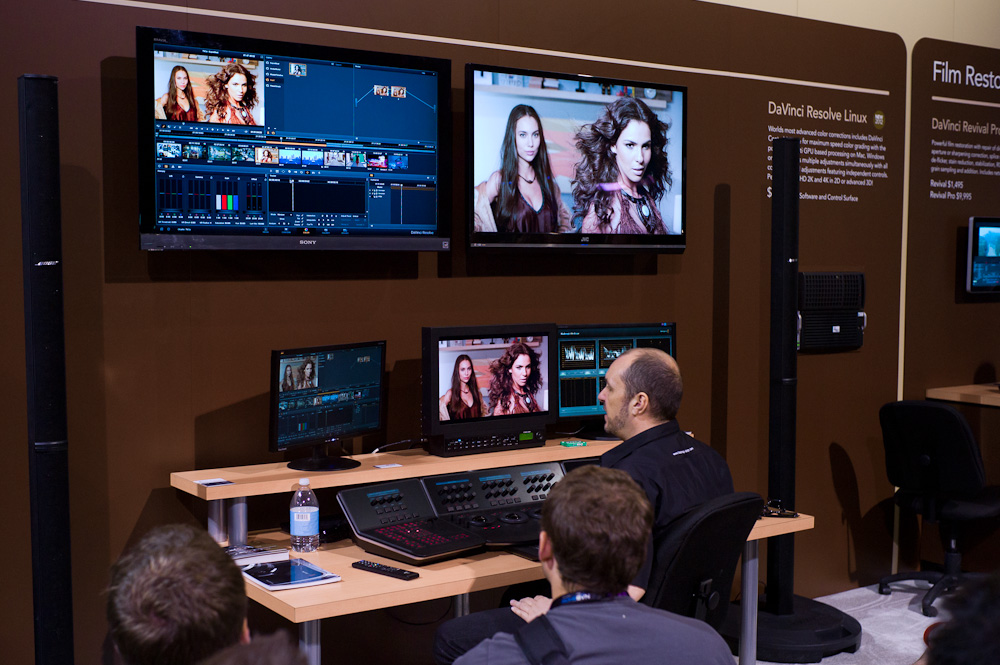
BLACKMAGIC DESIGNS:

I'm pretty excited about Resolve 9 but interestingly enough, this is the talk of NAB 2012 - the Blackmagic Cinema Camera aka "My First 2K", a $3000 camera that comes with $1700 of freebies (and I mean that in the MOST non-condescending way. I'm actually quite interested in this camera.. but c'mon look at it.. ViewMaster!)

L1001475.jpg
L1001474.jpg
photo-1.jpg

One thing that no one is talking about with this camera is that the sensor is quite small by today's standards, a bit more generous than Super 16. The mount is EF and these still lenses are going to be quite telephoto on this small sesnor. 3x more telephoto in fact so that super wide angle Canon 8mm is going to be about a 24mm in Full Frame terms. The other thing is the practical resolution of a Bayer pattern chip at 2432x1366 after demosaicing is a bit less than 1920x1080 with chroma subsampling around 4:2:0. That's just the nature of debayering but it does offer very robust recording formats, 12 bit Raw and Log encoded ProRes 4444 and DNx RGB. 

Resolve 9

L1001456.jpg

The users spoke and BMD clearly listened. Resolve 9 is now a full fledged dailies solution with the inclusion of audio pass-through and syncing, burn ins, super clean interface and media management, and intuitive new toolset. No word on whether the dailies component of 9 will be available in Lite or whether Lite will even continue to exist. I'm guessing you're going to have to shell out $1000 to have access to the new features which fair enough. Or you can just buy their camera and get it for free ;)

On the topic of dailies and on-set deliverables -

Everyone is getting into this game now. Assimilate was showing Scratch "The Next Thing" (working title) which is looking more powerful than ever and in my opinion Lab still offers the best cost to value ratio and user support. YoYotta was demoing realtime F65 rendering with Yo Dailies, ColorFront introed a low cost version of On-Set Dailies called Express Dailies, Filmlight has their low cost version Baselight Transfer, Adobe SpeedGrade CS6, etc. Not to mention a handful of software startups with their own offerings. Price tags on these wares run the gamut of course and each one offers its unique take on the complex problem of creating a dailies pipeline. Now that there are so many options, in my opinion the true separating factor will be support. The importance of having an actual human being to communicate with for troubleshooting, software customization, and feature requests can't be understated. Among this crop, some definitely understand this whereas others, maybe not so much. 

On a software related note - Autodesk Smoke all-in-one editing and effects package now for Mac. $15,000 $3500. Yet another once nearly unattainable pro tool looking to go mass market through aggressive pricing. 

SONY:

4k projection of a variety of material from the F65; all manner of conditions and mixed lighting. It was very good to see what this camera is actually capable of and it turns out, the potential is enormous. 

L1001471.jpg

4k can only be fully appreciated in a proper 4k projection. It's difficult to gauge the extra resolution on a HDTV or even one of the smaller 4k LCD displays that were floating around the show. Suffice to say, the image quality is remarkable. 

4k Stitch View:

L1001468.jpg

This is a very interesting application of 4k technology. 2 F65's side by side, both rasters are seamlessly stitched into one 8k picture that can you can pan and tilt around in realtime with no resolution loss until you get to 1080. It's applications like this, an unintended useful outcome of the technology, that really excites me about all this stuff. I think this technological renaissance we're experiencing in motion pictures can and should extend far beyond the realm of film/tv.  

Sony NEX-FS700:

L1001426.jpg

Everything about this has me scratching my head - from the form factor, to the generous specs (btw 250 fps at 1080p), the TBD 4k Raw recording, to the price ("less than $10,000). It's an odd one but it's a potentially very cool imaging machine nonetheless. 

CANON:

Canon EOS-1D C

canon-eos-1d-c-jjc.jpeg
photo-3.jpg

I'm way more excited about this than I thought I would be; the specs are out of control and the images coming out of the camera are really impressive. This is a true digital stills and motion picture camera. It's got the form factor of a SLR but all the video features you could ask for - clean output, multiple resolutions and sensor windows, multiple compresson schemes, etc. The 4k video isn't raw but is compressed to 422 at 500 Mbps and written out to compact flash. I didn't see any interface on the camera other than HDMI so I'm assuming a 4k raw recording via transport stream isn't possible. Regardless, I think this is THE camera for someone looking to do both high quality stills and video with one machine and not looking to spend a fortune on peripheral equipment. 

This cracked me up so I took a picture -

photo-2.jpg

ISO 204,800! On the monitor the video was looking super clean at 1600 but these days that isn't as special as it used to be. 

Canon C500:

photo-5.jpg

I think where the C300 was lackluster, this camera brings it. No one seems to know how these 4k streams will be recorded quite yet but Convergent Design is ready to accomodate whatever with the Gemini Raw. All these cameras, it's a little overwhelming. I think with all of these new acquistion options, a universal workflow is going to have to emerge or anything that comes out trying to reinvent the wheel is going to sunk before the ship even sails. Once again, we've just been spoiled by the ease of the Alexa. For large scale productions requiring a fast turnaround, vendors offering up something new need to make it as painless as possible or it's going to be a tough sell.

PANASONIC:

Behind glass and very difficult to photograph was this.. 4k "Varicam" Concept Camera.

photo-6.jpg

It's modular and comes in pieces like the EPIC and it's about the same size. Not much info to be gleaned other than AVC Ultra codec recorded to P2 Micro cards which are high capacity SD cards encased in stainless steel or some kind of tough alloy and the 4k recording is not Raw but rather Linear RGB. I'll reserve judgment but my instincts are leaning towards, "Too little. Too late."

SONNET AND THE TOPIC OF "MAC EXPANSION":

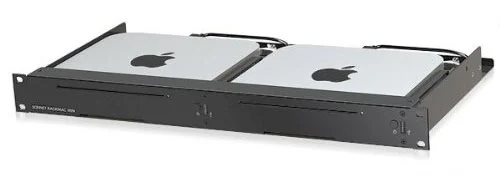
The consensus at the show regarding Apple's commitment to the pro market was grim to say the least. Even the future of 17" MacBook Pro has been called into question... I'm seriously about to start stockpiling computers. But you never know with Apple and that's the thing. They could announce something tomorrow and this discussion would be over. One has to maintain a cautious optimism with Apple products which is why I haven't started my stockpile just yet. I try and get as much mileage as I can on-set with 17" MBP's. I'll bring a tower out if I have to but my M.O. is usually to try and keep a small footprint and do a lot with a little. That said, I'm very excited about some of the stuff Sonnet is working on. Like the RackMac 1U shelf for Mac Mini's!

rack-min-2x.jpeg

And this kind of blew me away.. xMac mini Server

L1001480.jpg

xMac™ mini Server 1U Rackmount PCIe 2.0 Expansion System With Thunderbolt™ Ports

Sonnet’s Xmac™ mini Server (previously known as RackMac mini Xserver) 1U rackmount PCIe 2.0 expansion system with two Thunderbolt™ Ports mounts a Mac® mini inside a specially designed enclosure that also contains two x16 (x4 mode) PCIe 2.0 slots, a 150W power supply, and an installed Gigabit Ethernet card. This system enables users to plug in two PCIe 2.0 adapter cards (one half-length and one full-length) to slots connected to the Mac mini via locking Thunderbolt cables while allowing the connection of additional Thunderbolt peripherals to the daisy-chain Thunderbolt port.

A powerful and expandable computer that fits in your rack? This might be it. If Apple jettisons the Mac Tower, maybe they'll come out with a suped-up Mac Mini. Drop it in something like this and you're ripping. At least in theory ha.

Echo Express Pro Expansion Chassis for PCIe

These are a nice size.

echoexpress.jpeg

The Magma Thunderbolt ExpressBox 3T is a similar solution but it's a monster. The thing holds 3 PCie cards so it's nearly the size of a tower. You could get to a certain point where you're trying to make a laptop into something that it's just not. Is it worth it and is it really even feasible? At any rate, modularity is now the name of the game and I like to see lots and lots of viable options. 

9-7-2011eb3ttop.jpeg

AND ONE LAST THING:

I'm really running out of time for this post but this an item that's very cool and under the radar that I wanted to write about -

AXIS1 Single Channel Wireless Lens Control System:

L1001432.jpg

This impressively machined motor can be used for focus, iris, or zoom and the control is very nuanced. The range is similar to what you would get with a Preston. These are produced by a gentleman in the UK named Peter Hoare and the kit goes for about $5000. I've been looking for a solution for wireless Iris control and a couple of these might be it. 

That's all I've got for now. I'll try and revisit this post at a later date. 

HD Monitor Calibration - White Balance and Color Bars

HD Monitor Calibration - White Balance and Color Bars

February 12, 2012

This post is in regards to HD Rec. 709 monitor calibration only. There are several issues relating to standard definition video and monitoring that do not apply to HD.

1. NTSC Setup, or 7.5 IRE (%) Black Level. Setup is for standard definition only. The black portion of HD test signals hit 0 IRE (%) on the waveform. 

2. Phase: There is no Phase control for digital HD monitoring. Only CHROMA (saturation) affects picture as Phase relating to monitoring is an analog issue only. 

COLOR BAR TEST SIGNALS:

Many cameras and recording decks generate color bars - either the HD SMPTE (Society of Motion Picture and Television Engineers) version, which is this:

SMPTE HD

SMPTE HD

Or the newer HD specific version, ARIB (Association of Radio Industries and Businesses):

ARIB

ARIB

Correct use of these test signals will help you properly set your HD monitor's Brightness (black level), Contrast (white level), and Chroma (color saturation level). The process of using either of these color fields is virtually identical. While color bars will help you to setup aspects of your monitor, they do nothing to reveal whether or not it's calibrated, meaning it's accurately reproducing colors and a neutral chroma-free gray scale. This is the most critical component of monitoring and is accomplished through a White Balance Adjustment.

Part 1: Monitor White Balance

When we are calibrating a HD monitor, we are adjusting it so that 100% white is reproduced as completely neutral and chroma free within the Rec. 709 color gamut

Rec. 709 gamut / color space

Rec. 709 is the standard color space for HD images. It specifies a white point at D65, 6500 degrees kelvin. If this white point is placed correctly, it should ensure that all colors and grayscale within the gamut are accurately reproduced. If it does not, then there are calibration issues that cannot be resolve through a white balance adjustment alone.

When we white balance a monitor we start at D65 and then adjust Red, Green, and Blue gains to push 100% into the correct target white point. As is exemplified in the graphic above, this is represented by a two dimensional chart with x and coordinates. For LCD's, CRT's, and other legacy displays the coordinates for white within Rec. 709 are x .313 y .329

These adjustments are made using a spectrophotometer or colorimeter aka "probe". The process of white balance adjustment with a probe is similar from monitor to monitor. Some can use a probe to do this process automatically whereas others must be done manually.

Abel Cine has a great article on how to use this hardware / software combination to White Balance your monitor >>>  

An overview of the process, first input a 100% white test signal into the monitor and then use the probe to objectively measure the screen. It will tell where this white image is hitting in the gamut by way of x and y coordinates. From here, RGB gains are adjusted until the probe verifies that white is hitting the correct coordinates, x .313 y .329. If you're using an OLED monitor, you will use different coordinates than x .313 y .329 and you may need to adjust Bias as well to compensate for chroma cast in the dark tones of the picture. This process is very similar to adjusting White Balance, just using 20% neutral gray instead of 100% white. 

The most inexpensive way to do a White Balance Adjustment on your monitor is with a free software from Sony used with the i1 Pro and i1 Pro 2 probes. These aren't the most accurate probes available but they are well priced and I've had very good results aligning and matching displays with them. 

Use the probe / software and adjust RGB Gains and Bias to hit the correct targets for both 100% White and 20% Gray. Color temperature is denoted by "x" and "y". Luminance level is "Y". 

100% White (Gains)

x .313

y .329

Y 100 (studio level)

20% Gray (Bias)

x .313

y .329

Y 2.7 (gamma 2.2)

The x and y points will always be the same for both Gain and Bias. The Y level for Bias will change with the gamma setting be it 2.2, 2.4, or 2.6. Consult your manufacturer!  

AN IMPORTANT NOTE ON MONITOR GAMMA:

Rec. 709 doesn't actually specify a gamma but the de facto standard is 2.2. The newer Rec. 1886 specs gamma at 2.4. This topic is beyond the scope of this post so I've written a separate article on it. Rec.ommendations for Display Gamma >>> For simplicities sake, this article assumes we are working at a gamma of 2.2

Once we're successfully white balanced and selected gamma, we can now use color bars to finish the calibration process.

Part 2: Setting Brightness, Contrast, and Chroma Level with Color Bars

AN ANALYSIS OF THE SMPTE HD COLOR FIELD:

The components of this test signal are 75% Contrast Color Bars (Yellow, Cyan, Green, Magenta, Red, Blue), 20% Blue Chip, 10% Purple Chip, 75% Contrast White Chip, 100% Contrast White Chip, 0% Black chips, and The Pluge. When using this test signal to set Brightness, Contrast, and Chroma, all you really need to concern yourself with are the 75% Color Bars, 100% White Chip, and Pluge. The 20% Blue Chip and 10% Purple Chip fall along the IQ Line on the Vectorscope for verification that the color information in the test signal is accurately centered on the scope. 

The Pluge will help you set your Brightness (Black Level). It consists of a -3.5% (IRE) chip on the left, 0% chip in the middle, and 3% chip on the right.

digital-smpte2012.jpg

Here are SMPTE Color Bars with lifted blacks so you can see the pluge better:

smpte169_bright.jpg

Here's the same signal's luma waveform. This helps to see where everything in the field is hitting in terms of level, particularly the pluge. 

smpte_waveform75_2012.jpg

And Vectorscope. You can see that each of the color bars lines up perfectly with thier targets indicating that these are pure, undiluted primary and secondary video colors. If this was a 100% contrast color field, the vectors would land perfectly in their little targets; R = Red, Mg = Magneta, B = Blue, Cy = Cyan, G = Green, Yl = Yellow. 

CAP20090328070812.jpeg

SETTING BRIGHTNESS, CONTRAST, AND COLOR WITH HD SMPTE BARS:

SMPTE HD

1. Set your gamma to 2.2 and White Balance to D65 (or User if you have done a custom White Balance Adjustment). Set your Brightness, Contrast, and Chroma to their default levels. If you have a display that can be custom white balanced, make sure that you're aligned before starting this. If you're working with a facility on a project, they can send a technician with a probe to you and he can do it for you. Or you can talk to you manufacturer and get a list of recommended probes for use with your display along with x,y (Color Temperature), and Y (Luminance) targets so you can do it yourself. Once you're there, send the HD SMPTE test signal to your monitor via HD-SDI. This is best done in a dark environment so if you're outside or in an unshielded location, try and keep as much ambient light and direct light off the display as you can. 

2. Everyone has their own way of doing this. I start with Contrast which is the most subjective. Looking at the 100% white chip, turn the contrast up until it visually stops getting any brighter. Now back it off a little bit. This will be different on every display and really the smart way to do is with a probe that reads Luminance level. 

3. By default, increasing Contrast will also somewhat raise the black level. Now use the pluge and set your Brightness so that the left (-3%) pluge chip disappears into the surrounding 0% black field. The right chip which reads 3.5% on the waveform should be just barely visible. 

4. Now check your contrast again. Is the 100% white chip still hitting peak white? If you need to adjust, make sure to go back and check your pluge again. By going back and forth between these 2 adjustments, you should be able to arrive at a satisfactory black and white level. 

5. Now check Chroma. Your monitor most likely has some sort of Blue Only feature. This is used to help you correctly set your color saturation level with Chroma. Turn it on and have a look. 

If it looks something like this, you're in good shape. 

correct.jpg

If you're looking at something like this, then the Chroma level is incorrect.

incorrect.jpeg

Adjust the Chroma level on the display until you're looking at solid, alternating bars of equal value. The larger top portion of each individual bar needs to blend into the smaller section beneath it. 

6. If you find that you have to make some adjustments to Chroma, this could up slightly changing your overall contrast so turn Blue Only off and check the pluge and 100% white chip again. By tweaking back and forth between all of these adjustments, you will be able to find the most accurate settings your monitor can produce. Please note that some monitors don't have Blue Only but can display in Monochrome. The Chroma calibration process with Monochrome is identical to Blue Only. 

At the end of the process you should be looking at something like this:

smpte169-correct.jpg

AN ANALYSIS OF THE ARIB COLOR FIELD:

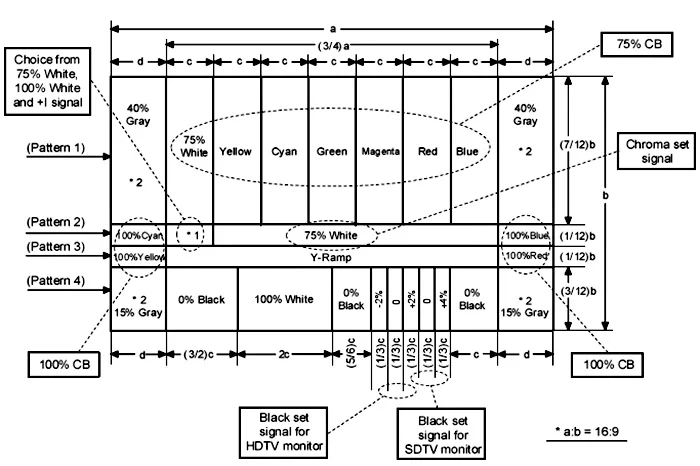
This test signal has a greater variety of components than it's SMPTE relative. It contains the same 75% Contrast Color Bars, with the addition of neutral gray chips at various luma levels, and pluge with more steps (-2%, 2%, and 4%) that I suppose offer a bit more finesse for setting black level with Brightness. 

ARIB

Here's a handy diagram detailing what's what in the ARIB:

aribexplained.jpeg

Here's the luma waveform of the signal. Note the 0%-100% gradient that ramps through the middle of the field and the pluge at -2, 2, and 4%.

arib_wfm-1.jpeg

SETTING BRIGHTNESS, CONTRAST, AND COLOR WITH ARIB BARS:

ARIB

Though it looks radically different, on principle it's the same as the SMPTE. Follow the exact same steps outlined above when using this signal to arrive at correct Brightness, Contrast and Chroma levels. 

The biggest difference is with the pluge. When using this signal, the middle (2%) and right (4%) pluge chips should be barely visible with the the -2% chip blending into the surrounding 0% black field. 

When setting Chroma with Blue Only, this is what you should be looking at with the correct level:

arib-blue.jpeg

And when you're all done, this is what you should be looking at:

ARIB

SMPTE 100% COLOR FIELD:

100-new.jpg

Some recording decks will output these but very few cameras will. I don't think this is as useful a calibration signal as there's no pluge to help you set black level. It's good for checking saturation on displays or if for some reason you needed to check a 100% signal in a video system. This field contains the 3 primary video colors (Red, Green, and Blue) and 3 secondary colors (Yellow, Cyan, and Magenta) at 100% contrast along with a 0% Black Chip and 100% White Chip. 

On the vectorscope at Gain x2, you can see the colors hit their 100% targets spot on.

CAP20090328070637.jpeg

When looking at this color field with Blue Only and if your Chroma level is set correctly, you should be seeing something like this - bars of equal and alternating value:

100-new-blue.jpg

Canon Picture Styles and Chroma Du Monde

Canon Picture Styles and Chroma Du Monde

I was curious about the real differences on the video level between the various Canon HDSLR Picture Styles so I set up the DSC Labs RED CamBook Chroma Du Monde 28R and evenly lit it with ambient daylight.

redbook2.jpg

Converting the camera's HDMI OUT to SDI, I set the exposure in the recommended way for the chart, putting the grayscale's crossing point at just under 60% on the waveform. I then made no exposure changes and just dialed through the various Canon Picture Styles capturing the waveform and vectorscope data from the Leader monitor.

Camera and Lens: Canon 5D Mark 2, Canon 24-105mm f/4 Zoom

All styles were adjusted to the following "standard practice" specs:

Contrast: all the way down

Sharpness: all the way down

Saturation: down 2 points

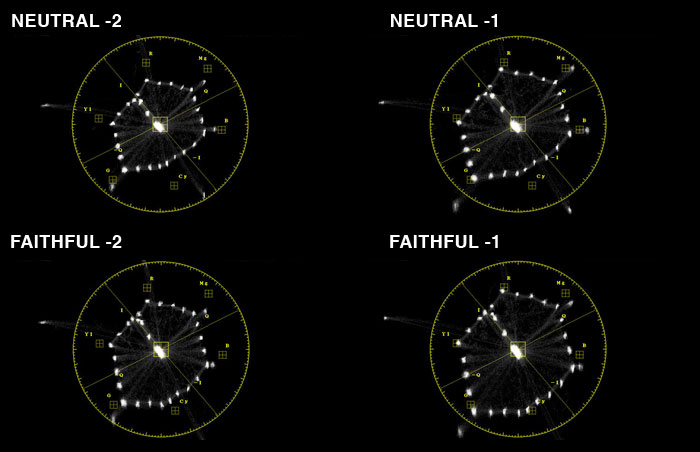
For Neutral and Faithful, the two "out of the box" Picture Styles that I find to be well suited for video, I looked at Saturation -1 as well to see how much difference 1 point makes on the scopes. The answer is a lot. Most people would agree that the colors on these cameras are over saturated and need to be backed off a bit to look more natural and less video. When adjusting a video camera's colorimetry using DSC charts, the theoretical goal is to ensure faithful color reproduction by aligning the primary colors into their targets. The color response that this creates however may not be suitable for all projects it may even look a bit over saturated compared to the low sat "film like" color matrices found in many prosumer camcorders.

Have a look:

canon_vector2.jpg

Let's have a closer look at Faithful, Saturation -1

faithful1.jpg
f1_vector_target.jpg

This is about as close as we can get to hitting our targets with the Canon 5D Mark 2. In my opinion this setting doesn't look as nice as Saturation -2 so as always, your eye is really your best tool for image evaluation.

Canon Picture Styles: Looking at these thumbnails alone, it's a little hard to tell the difference.

captures_comp.jpg

Waveforms: Glancing at these however you can see that there is a small difference in gamma response from Style to Style, Neutral being the most compressed in comparison.

canon_wfm.jpg

Vectorscope: Even with the saturation turned down, Portrait and Landscape are very extreme color looks compared to the more muted tones of Neutral and Standard. Faithful on the other hand, does what it say it does and offers the most accurately aligned video colors of the bunch.

canon_vector.jpg

In order to really see the differences though, you need to look at the chart in the context of video. Here's a file for you, feel free to download it and take into FCP where you can open up the scopes and really scrutinize the differences between Picture Styles.

Note: RED CamBook has a highly reflective surface so must be angled back to avoid seeing yourself in it which is why the image is skewed in this video. . There is a small amount of gamma lift that happens in Vimeo upon conversion to their format. Why does it do that? I don't know and I'm still searching for a workaround.

Canon 5D Mark 2 Picture Styles and Chroma Du Monde from Ben Cain / Negative Spaces on Vimeo.

As for the Canon 7D and 1D Mark IV? From what I discovered from the tests Jem and I did at Sekonic, the color response from the various Picture Styles is very similar to the results found here.